Building A Longboard

I recently took a woodworking class where I learned to build my own longboard. I’m not an expert on the process, but I’d love to show you what I learned!  First we cut the wood into planks that were 12 inches wide, using a table saw. We used Baltic Birch. Depending on what kind of flex you want your board to have, you can cut either in a vertical or a horizontal direction. I wanted a kicktail on my board, so I wanted it to flex the length of the board rather than the width. We used 4 of these planks per deck.

building a longboard

Next we designed our own boards based on the features we wanted. We considered whether we wanted to build it for speed, hills, or cruising. That helped to determine the shape, length, and whether the board would have any curvature.

building a longboard

I wanted a firm board without a lot of flex, but with a kicktail for easier maneuverability. I opted for a shorter board at 36 inches since I have a small stance (most of the longboards were around 46).

building a longboard

Next we built the press. We cut strips of 2-inch wood to build a frame, gluing and then stapling it together. We added blocks at points where we want the board to curve. Some people had blocks on the center of the long sides, so the deck would gently curve inward. I kept mine flat, except for kicktail at back, which I added two blocks for.

IMG_6263

We put the “prettiest” board face down on the press frame, then added a layer of strong wood glue using spatulas. We quickly added the second board, then repeated the process with the other boards. The final board had the drawn template of our deck.

building a longboard

Then we added clamps, using scrap wood as needed to prevent marking the deck.  It’s important to use enough of these so your layers won’t separate. Leave it for 24 hours.

building a longboard

The next day we removed it from the clamps and I used a band saw to cut out along my drawn template. It was my first time using a band saw and I thought it was a lot like using a sewing machine :) Then I used a drill press to add the holes for the trucks.

building a longboard

I put on some trucks to test it out. It had some wheel bite when carving, so I used a band saw to sand down wheel wells where the wheel hit the underside of the deck.

And then it rode like a dream! building a longboard

Of course I was just as excited to paint it as I was to build it…

building a longboard

This was the sketch I started out with. I wanted to try out some Prism Lettering using enamel paint. There’s a tutorial on it here.

building a longboard

And I ended up going with stripes instead of the original flourishes.

building a longboard

I opted for some script lettering on the kicktail. Then I sprayed it with clear varnish and added some black grip tape.

building a longboard

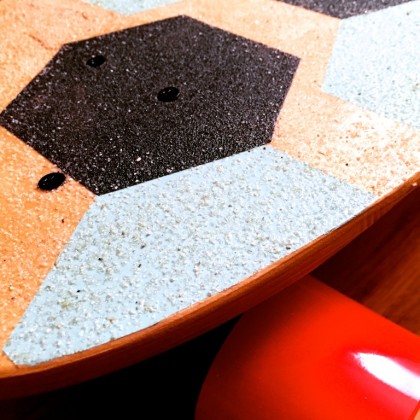
I didn’t think it was gripping enough, so a friend suggested another idea. We used a clear automotive enamel spray (available at auto supply stores) then sprinkled in beach sand with a salt shaker while it was still wet. (You could also use crushed lava rock.)

build a longboard

The end result is a super textured and glossy finish that is weatherproof and extremely durable.
build a longboard

Plus, look at it sparkle!

build a longboard

I finished it up with some 71mm Arbor Summit Wheels (sucrose, so eco-friendly) and reverse kingpin trucks.

build a longboard

It was fun to build and it’s even more fun to ride :)

New! Buy Handlettered Prints & More

1

I often get asked whether I sell handlettered prints. Until now, I’ve always had to say no. I’d love to share my work with you, but I really hate dealing with shipping! So I’ve paired up with Redbubble to open an online shop selling quality merchandise, printed on demand just for you!  They’ll ship it out quickly, with a 100% satisfaction guarantee!

Here’s how it works: visit my shop at redbubble.com/people/madebymarzipan.

 hand lettered merchandise

Click on shop, then browse by art print or by type of merchandise. There are lots of items to choose from…

buy hand lettered merchandise

Like hoodies, with or without zippers.

 hand lettered merchandise

Postcards start at around $2! Cute!

 hand lettered merchandise

Wouldn’t a throw pillow like this be the perfect accent on your bed or couch?

buy hand lettered merchandise

There are coffee cups and travel mugs… these would make great gifts!

 hand lettered merchandise

And my favorite: practical tote bags!

There’s a lot more to see, so please feel free to check out the new shop at  redbubble.com/people/madebymarzipan!

A Few of My Favorite Things

3

I often get asked about my favorite crafting supplies… what’s my favorite nib? Pen? Adhesive? Today I’m sharing some of my favorite things, and I’ll tell you why I love them!

Paper Crafting

I always have a stash of Glue Dots in my drawer! These are mess-free, super strong little circles that hold anything from paper to ribbons to buttons.

For larger areas, I prefer to use a tape runner, like E-Z Runner. It lays down a smooth line of double-sided adhesive.

I love Staz-On ink for stamping. You can watercolor over it, and I’ve even successfully stamped on clothing with it.

Calligraphy

While I’ve tried many brands of nibs–including some very pricey ones– I’ve found that Speedball C-class nibs are both reliable and affordable. They’re available at most craft stores. I’ve also found that I prefer their plastic nib holder over the many varieties of wooden nib holders I’ve purchased. It’s nothing fancy, but it works well.

If you’d like to try a nib with more precision for fine calligraphy work, I recommend trying a Brause “blue pumpkin,” or steno nib.

When it comes to ink, I can’t tell much of a difference between the many brands of India Ink I’ve tried. I’ve liked them all! For white ink, Dr. Marian Davis Bleedproof White wins out.

Hand Lettering

When it comes to hand lettering, I do the majority of my work on standard white cardstock, which I buy in large packages at Wal-Mart. I go through a lot of paper! But for important pieces, I prefer Strathmore Bristol paper. It has a nice heavy weight and a super smooth surface.

I like to do my sketching with a mechanical pencil. I’m not too picky about the lead… but the eraser makes a world of difference. So my favorite option is Sakura’s Sumo Grip mechanical pencil. It has a comfortable gel-like grip, and an amazing extendable eraser that seems to go on for-ev-er. And you can even buy eraser refills! But I’ve had mine for a long time and still haven’t needed to replace the eraser.

I’m very loyal to Pigma Micron pens! The range of nib sizes makes it easy for me to achieve the designs I envision. The ink won’t smear or fade when erased, which is super important! They do come in color, but most of the time I just stick with black.

Sewing

There are a few items that make sewing so much more enjoyable! I love to use Spray ‘n Bond fabric adhesive for washable basting. I won’t quilt without it!

I think Heat n’ Bond Iron-On Vinyl is an amazing product! You can make your fabric water and stain resistant without the bulk of traditional clear vinyl. I’ve used this on everything from diaper bags to kitchen chairs. You can also buy it off the bolt.

My Gingher dressmaker shears are an item I can’t live without. If you’ve never tried cutting with really good fabric scissors, you don’t know what you’re missing! Make sure to only use them on fabric and they’ll last a very long time.

Finally, I adore my Olfa rotary cutter. Use it with a clear quilter’s ruler to quickly cut perfect strips and squares.

Now it’s your turn! What is the one crafting or sewing item you couldn’t live without?

Note: clicking on the photos will take you to an Amazon affiliate link. While I was not endorsed to write this post, I may receive proceeds from resulting sales.